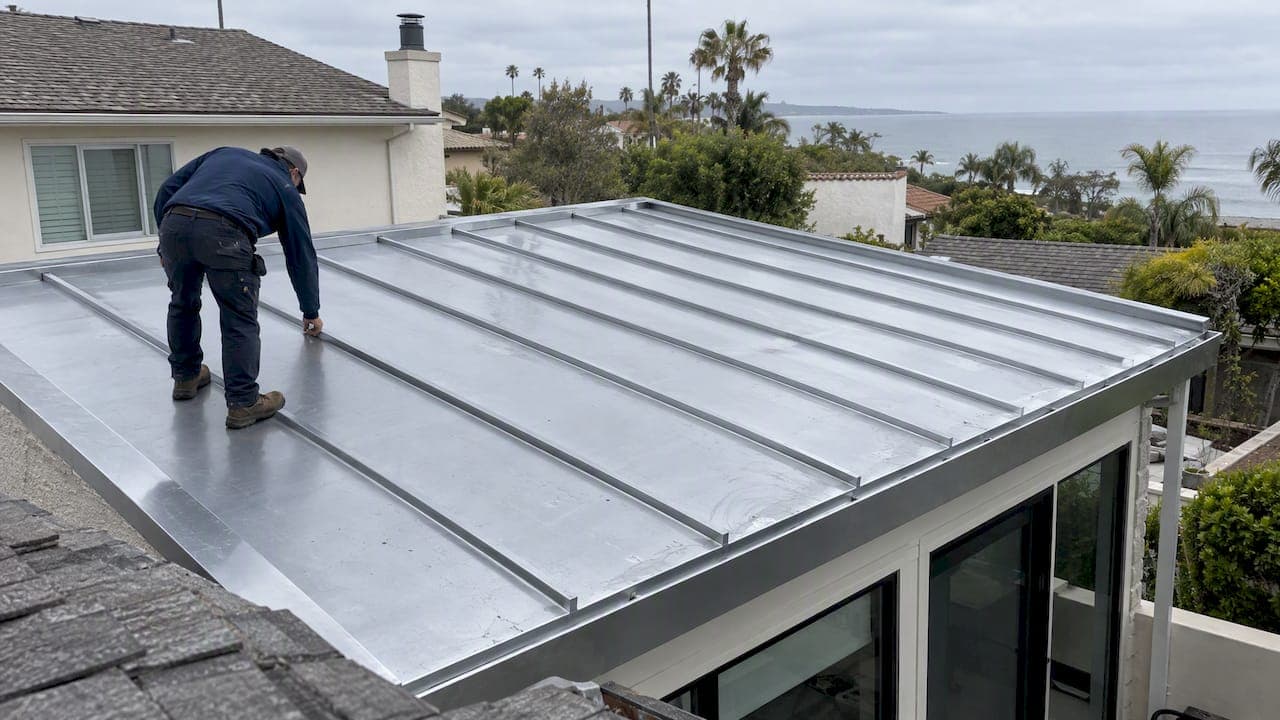
Mechanically seamed standing seam metal roofing can perform down to a 1/4:12 pitch, while exposed-fastener panels generally need at least 3:12 to stay watertight. The real deciding factors on a low-slope roof are seam type, underlayment, and whether you can eliminate panel end laps. Retrofitting an existing flat or near-flat roof to accept metal usually means adding slope first, through sleepers or sub-framing, before a single panel goes down.
TL;DR:
- Mechanical seamed panels can perform reliably down to 1/4:12 pitch if seam quality and underlayment are properly specified and installed.
- End laps, curb details, and penetrations are the main leak risks at low slopes, making site-formed, full-length panels essential for watertightness.
- Underlayment with ice and water shield, combined with correct insulation layering and sealing, is critical to prevent condensation and moisture issues.
- Retrofit options to add slope include tapered sleepers, low-profile framing, or installing new panels over existing metal, each with specific structural considerations.
- Proper installation checks, including seam inspection and clip selection, are vital to avoid common failures that cause leaks in low-slope metal roofing systems.
Table of Contents
- What counts as low slope, and what the codes allow
- Picking the right panel and seam for a low-slope roof
- Underlayment and moisture control that prevent condensation
- Retrofit paths: adding slope without tearing off the deck
- Detailing curbs, drains, and penetrations without creating leak points
- Installation checklist to avoid the most common leak causes
- What drives cost, how warranties work, and when to call a professional
- How SW Metal Roofing approaches low-slope coastal installations
- An honest take on low-slope metal roofing risk
- Get a low-slope standing seam estimate
- FAQ
- Sources
What counts as low slope, and what the codes allow
The roofing industry generally defines low slope as 3:12 or less, and some contractors treat 2:12 as the practical break point between standard shingle-style installation and systems that need special detailing. Below that line, water moves slowly across the roof surface instead of draining quickly, so the assembly has to work more like a membrane than a shedding surface.
That distinction matters because the International Building Code treats steep-slope roofs as hydrokinetic (designed to shed water fast) and low-slope roofs as hydrostatic (designed to resist standing water and wind-driven rain). Mechanically seamed standing seam systems are rated for the hydrostatic end of that range, with some manufacturers engineering panels to perform at 1/4:12, or a quarter inch of rise per foot of run.
At the lower end, even small installation errors in seam height or lap direction can turn a theoretically watertight roof into one that holds water against a seam during a storm.

Picking the right panel and seam for a low-slope roof
Seam type, not panel style alone, determines whether a metal roof will hold water out at low pitch. Mechanical double-lock seams, formed with a seaming tool that folds the panel edges over twice, give the best resistance to wind-driven rain and ponding at the lowest slopes. Single-lock seams can work in less demanding conditions but offer a thinner margin of error. Snap-lock panels, which rely on a friction fit rather than a mechanically formed seam, are rarely a good match for anything below roughly 3:12, since they depend on gravity and clean drainage rather than a sealed joint.

Profile choice follows the building’s geometry. Vertical-rib and site-formed panels suit long runs, irregular roof shapes, or roofs with frequent penetrations, because they can be fabricated to exact lengths on site. Trapezoidal panels work well on simple rectangular structures where panel runs are short and uninterrupted.
Panel length and end-lap strategy matter as much as the seam itself. Every field end lap is a potential leak point, so the Metal Roofing Contractors Association recommends using site-formed, full-length panels wherever possible and running transverse panels uphill of curbs to avoid laps near penetrations entirely. Wider panels reduce the number of seams per square foot but can be harder to seam tightly on very low slopes, so gauge and width should be chosen with the slope, not just the budget, in mind.
Underlayment and moisture control that prevent condensation
A low-slope metal roof lives or dies on what sits underneath the panels, not just the panels themselves. Self-adhering, high-temperature ice and water shield underlayment is the standard recommendation for slopes under about 2:12, where standard underlayments cannot reliably resist wind-driven rain or ponding at seams.
Moisture control also depends on getting the insulation and air layers in the right order. Guidance on deep energy retrofits for low-slope roof assemblies places the air-control layer below the rigid insulation, with continuous exterior rigid insulation installed in staggered layers and taped seams above it. That sequencing keeps warm, moist interior air from reaching a cold deck surface where it could condense.
- Use self-adhering ice and water shield across the full low-slope area, not just at eaves and valleys.
- Stagger rigid insulation joints between layers and tape every seam.
- Place the air-control layer beneath the insulation, never above it.
- Seal and tape parapet transitions with the same rigor as field seams.
Pro Tip: Treat the underlayment and insulation layers as the actual waterproofing system, and the metal panels as the wear surface protecting them.
Retrofit paths: adding slope without tearing off the deck
Most low-slope metal retrofits start with a flat or barely sloped roof that was never designed to shed water quickly, so the first decision is how to create slope without removing the existing structure; understanding permit needs and building rules is critical, as explained in this building code compliance guide for owners and contractors.
- Tapered sleepers: wood sleepers of increasing height, topped with new OSB sheathing and a water-resistive barrier, create positive drainage over an existing flat deck and are a common, cost-effective retrofit method.
- Low-profile sub-framing: light steel or wood framing raised above the existing roof creates a new slope plane, useful when you also want to add insulation thickness.
- Metal-over-metal retrofit: new panels install directly over an existing metal roof using furring strips, which saves demolition cost but adds detailing work at curbs and penetrations since clearances change.
Each method has structural limits. Longer purlin spans or wider panel widths need engineered framing to carry wind and snow loads, and any retrofit that adds more than a few inches of height should be checked against door thresholds, parapet heights, and rooftop equipment clearances before fabrication starts. A design guide to metal roof retrofit options walks through when each framing approach makes sense relative to the existing deck condition.
Detailing curbs, drains, and penetrations without creating leak points
Curbs and penetrations cause more low-slope leaks than open field seams, because they interrupt panel runs and concentrate water flow. Best practice calls for an over/under shingled curb configuration, built from .080-inch aluminum or 18-gauge stainless steel rather than galvanized steel, which can corrode at welds in coastal or humid environments.
- Keep curb clearance at a minimum of 12 inches upslope and 6 inches on the sides, measured from the nearest panel seam.
- Plan panel layout before fabrication so seams land away from curbs rather than running directly into them.
- Lap drain and scupper flashings so upper membrane layers always overlap lower ones, never the reverse.
- Treat every rooftop penetration as a candidate for a transverse panel run instead of a field end lap.
Hydrostatic testing under ASTM E2140 is the industry benchmark for how well a seam assembly resists water penetration, and it’s the standard manufacturers reference when rating panels for low-slope use. Curb and clearance guidance from the Metal Construction Association is built around that same testing logic: a curb detail that passes hydrostatic testing on paper can still fail if clearances or materials are wrong in the field.
Installation checklist to avoid the most common leak causes
Most low-slope metal roof failures trace back to a handful of repeatable mistakes, not material defects.
- Plan panel layout first so single runs cover as much roof as possible, minimizing field end laps.
- Keep end laps away from curbs and penetrations entirely when panel length allows it.
- Match clip type to location: fixed clips at the structural anchor point, sliding clips elsewhere to allow for thermal movement.
- Inspect seam closure and fastener seating before the next panel run covers the work.
Pro Tip: Walk every seam by hand before closing it, since a seaming tool can roll over a misaligned panel edge without fully locking it.
What drives cost, how warranties work, and when to call a professional
Cost on a low-slope metal roof depends on panel style, seam type, panel width, how much retrofit framing is needed to add slope, and the number of penetrations and curbs to detail. A straightforward standing seam installation on a simple roof costs less than one requiring sub-framing, custom site-formed panels, and multiple curb details.
Weathertightness warranties on properly installed low-slope systems often run for decades, reflecting the long service life standing seam roofs are known for when specified correctly. Routine maintenance means checking fastener seating, seam condition, and flashing integrity at regular intervals. Complex retrofits, solar integration, and coastal exposure all raise the stakes enough that hiring an experienced contractor is worth the premium over a DIY attempt.
How SW Metal Roofing approaches low-slope coastal installations
We fabricate custom panel lengths, including a snap-lock profile designed for coastal wind and salt exposure, which lets us plan runs that avoid field end laps rather than relying on stock panel sizes. Pairing mechanically seamed systems with integrated solar panel installation keeps retrofit detailing and roof penetrations under one scope instead of two separate trades. See examples of completed low-slope and standing seam projects in our gallery.
An honest take on low-slope metal roofing risk
The riskiest moment on a low-slope metal roof isn’t the panel choice. It’s the end lap someone added to save material. Eliminate laps and exposed fasteners first, then worry about everything else. A seaming machine in untrained hands causes more leaks than it prevents.
— Marcus
Get a low-slope standing seam estimate
If your roof sits at 3:12 or lower, we build panels to the exact lengths your layout needs rather than fitting stock sizes to your roof, which is how we avoid the end laps that cause most low-slope leaks. Every installation is backed by a warranty, and we handle solar integration within the same project scope when you need it.
Before requesting an estimate, have your roof’s pitch, square footage, and any curb or skylight locations ready. Start with our cost and estimate page to see what affects pricing on your specific roof.
FAQ
What is the lowest slope for a metal roof?
Some mechanically seamed standing seam systems are engineered to perform down to a 1/4:12 pitch, which is about a 2% grade. Exposed-fastener panels need a much steeper pitch, typically starting around 3:12, to shed water reliably.
What is the best roofing for a low-slope roof?
Mechanically seamed standing seam metal, particularly double-lock seams, is widely considered the strongest option for low-slope applications because the seam itself resists ponding and wind-driven rain rather than relying on gravity alone. Snap-lock panels are generally unsuitable at very low pitches.
What are the disadvantages of a low-slope roof?
Low-slope roofs drain more slowly, so they’re more vulnerable to ponding water, condensation inside the assembly, and leaks at curbs, seams, and penetrations if detailing is imprecise. They also demand stricter underlayment and insulation sequencing than steep-slope roofs to avoid trapped moisture.
Can you put metal on a 2 pitch?
Yes, a 2:12 pitch is within range for mechanically seamed standing seam systems, though it sits closer to the threshold where seam quality and underlayment choice become critical. Exposed-fastener panels are not recommended at this pitch.
Sources
- Low Slope Metal Roofing Resources
- Deep energy enclosure retrofit for Zero Energy Ready House (flat roofs)
- MRCA guidance on low-slope panels and end-lap elimination